TestConductor
Table of Contents
You can use TestConductor to test a model for which you generated a mini-RTE and have a working UML Target Debugger communication.
SodiusWillert SAS (ARXF-CP) and BTC Embedded Systems AG
(TestConductor) are working in close cooperation for optimal
integration.
The integration shown below is based on the existing TestConductor,
which you can use to test the UML behavior of an SWC.
Future versions will add: support testing an entire SWC as a unit and
test an SWC via external behavior using its AUTOSAR ports.
Introduction
Besides interactive testing of the application using the UML Target Debugger,
testing of parts of the model can be performed in a model based manner
using Rhapsody TestConductor.
Even though testing of an entire SWC as unit or the interaction of
multiple SWCs with each other will need a dedicated support of
ARXF by TestConductor, ArUML classes instantiated within SWC can
already now be unit-tested using TestConductor.
All TestConductor test activities are turned out in a particular test
harness. This test harness, referred to as TestArchitecture,
instantiates the System Under Test (SUT) in an environment of
test artifacts that can be influenced and instrumented by
automated techniques of TestConductor. These test artifacts are derived
form the original environment of the SUT in the users design. Automatic
TestArchitecture creation analyzes the relations of the SUT with other
design elements and then generates the required test artifacts in the
TestArchitecture from copies of the related elements, such that the SUT
can be stimulated by the test environment and the SUT's recations can
be observed in the test environment without affecting the user's model.
Example Model
The ARXF-CP comes with an example of a model which shows how ArUML classes instantiated within an SWC can already now be unit-tested using TestConductor
and show model coverage.
Open the Rhapsody project TestConductor from the directory
<ARXF_CP_V8.0.1 installation
folder>\ARXF_CP_V8.0.1\Samples\AUTOSAR\Model\InteriorLight\TestConductor
This example works out of the box except for two paths you must set for using it on your PC:
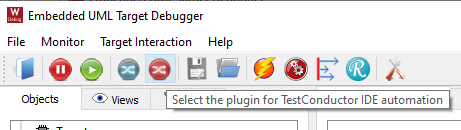
- when the UML Target Debugger is launched, the plugin selection for TestConductor IDE automation will allow you to set the path:
- use the Helper TC Environment ARXF-CP in the model to set the path used by TestConductor

If you have experience in creating a TestArchitecture and running TestConductor with the ARXF-CP, you could continue at the
section
Building to directly execute tests.
TestArchitecture
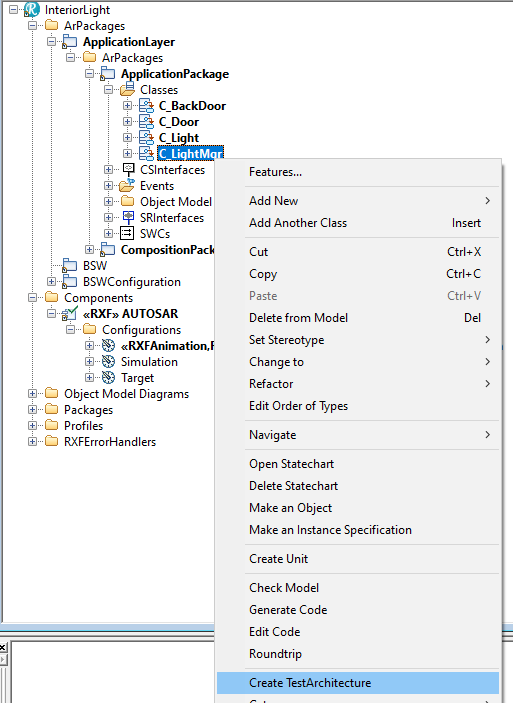
To create a unit test TestArchitecture for C_LightMgr, which is
instantiated as part of SWC LightManager, simply select the class in
the Rhapsody browser and invoke Create TestArchitecture from the
context menu.
TestArchitecture creation and TestConductor testing activities as well
as all specific definitions and stereotypes for testing are based on
the UML TestingProfile. The TestingProfile is part of the Rhapsody
installation, if Rhapsody was installed with TestConductor.
When invoking TestConductor the first time on a Rhapsody model,
TestConductor prompts for confirmation to add the TestingProfile to the
model. Of course, the TestingProfile only needs to be added once to the
model. Subsequent TestConductor activities will find the TestingProfile
in the model and will not ask again.
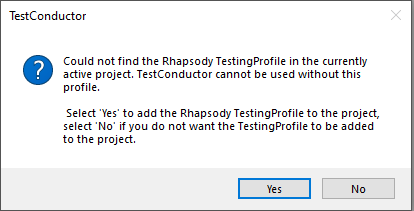
On confirmation with "Yes", TestConductor will add the TestingProfile
to the model and continue TestArchitecture creation for the selected
class C_LightMgr.
The TestArchitecture for C_LightMgr will be added to the model in a
separate TestPackage. This TestPackage contains two dedicated
sub-packages: a package for the instantantiation of SUT and test
artifacts, their interconnection and the TestCase definitions and
another sub-package for matters of execution control and test
arbitration. The latter sub-package is mainly used by TestConductor for
temporary artifacts and is of very limited interest for the user.
We, hence, focus on the architecture sub-package in the
following.
The building block of the TestArchitecture is the so-called
TestContext. The TestContext is a composite class, instantiating the
SUT and the test artifacts forming the test environment of the SUT.
So-called TestComponents have been generated from the classes and
objects with which the SUT has relations in the original model. In case
of C_LightMgr there is only one model relation that has to be regarded
in the TestArchitecture. C_LightMgr has an association to its
instantiating SWC LightManager. Therefore, a TestComponent LightManager
was introduced in the TestArchitecture (Note that CpSWC is a new term
in ArUML_ARXF_CP profile. Since only one applied new term can affect
the browser view, the TestComponent LightManager in the
TestArchitecture appears as SWC, but in fact is also a TestComponent).
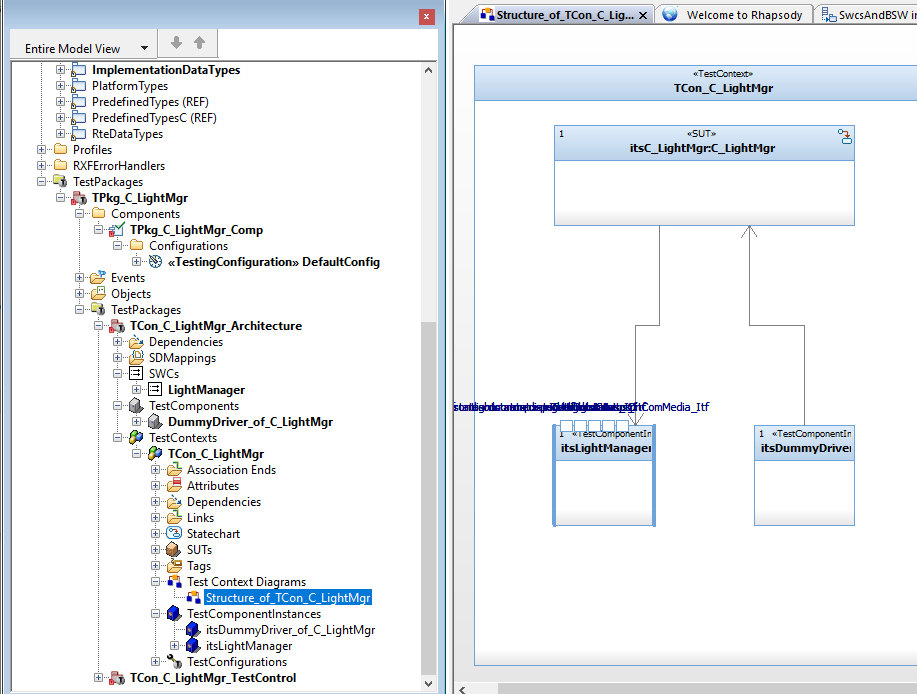
A dummy-driver TestComponent has been added to the TestArchitecture,
i.e. a fresh and new TestComponent artifact with an association to the
SUT. This dummy-driver can be used to stimulate the SUT for testing
purposes.
We will have to apply some manual modifications to the TestArchitecture
lin the following, but first we have to apply some changes to the code
generation component and configuration belonging to the
TestArchitecture.
TestConductor always equipps TestArchitectures with an own code
generation component and configuration. Particular scope settings will
be needed as well as certain includes and definitions for testing
purposes. Scope selection, settings and definitions as well as
specific testing related configurations can be set on the code
generation component and configuration of the TestArchitecture.
By default, TestConductor creates the code generation configuration for
visual studio compile environment and for the default framework OXF.
We want to change the used framework and use the RXF instead. In order
to make this change as easy as possible, ARXF comes with a dedicated
profile, that takes over all neccessary changes and sets all properties
and tags involved. It only requires specification of the predefined
visual studio project to be used for build and execution of the test
application.
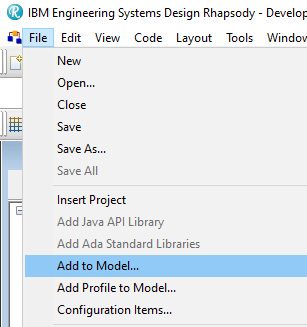
To load this profile in the model, invoke "File->Add to Model..." in Rhapsody
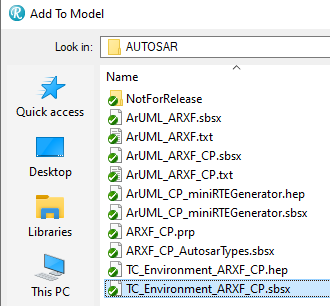
Navigate to the Profiles\Rhapsody\AUTOSAR directory and select TC_Environment_ARXF_CP.sbsx
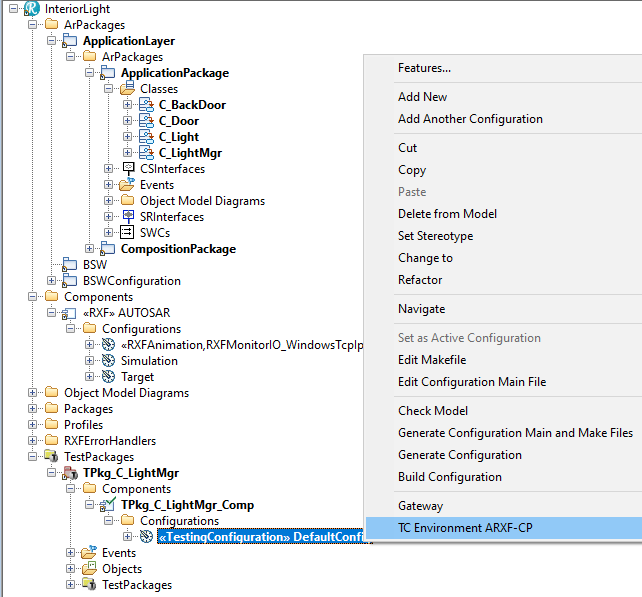
Once the profile has been added to the model, a new context men untry appears on code generation configurations.
Invoke the context menu item "TC Environment ARXF-CP" on the code
generation configuration of the TestArchitecture. The helper will open
a file opener dialog (Note, that the dialog sometimes opens behind
other open windows, in particular behind the Rhapsody application).
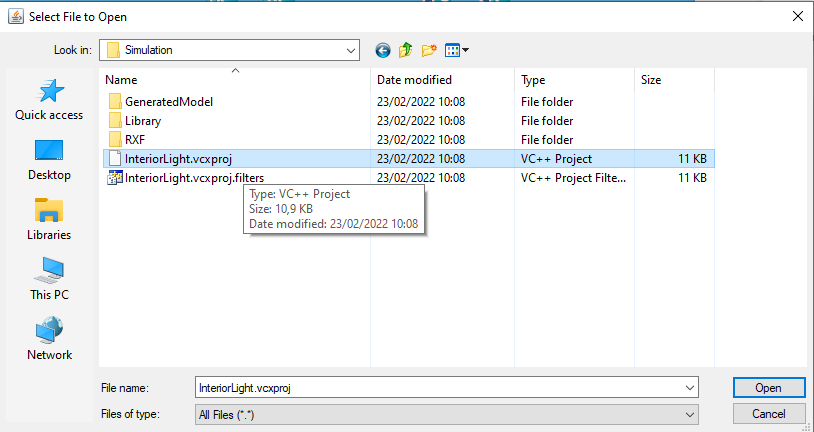
Navigate to the viual studio project to be used for building the test
application. In case of testing C_LightMgr, the existing
visual studio project in
Samples\AUTOSAR\Model\InteriorLight\ARUML\IDEProjects\AUTOSAR\Simulation
can be re-used.
AFter applying the helper to the code generation configurations, the
neccessary changes will be applied and the code generation
configuration will have the stereotypes RXF,
WSTTargetTestingConfiguration, RXFMonitorForTC and
RXFMonitorIO_WindowsTcpIp.
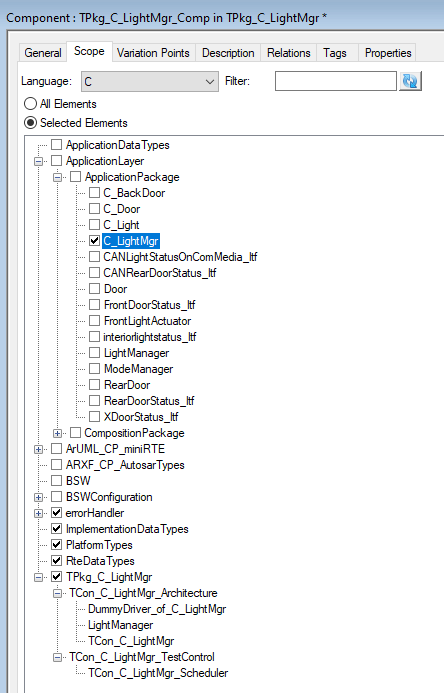
Next, we will adjust the scope of the code generation component.
Unfortunately, predefining the scope by TestConductor is a heuristic
approach and does sometimes not propose a very helpful preselection. In
case of the C_LightMgr, the proposed scope is much too large and
involves a lot of model elements, which are not needed in the scope of
the TestArchitecture. In particular, only the class C_LightMgr itself
is needed from ApplicationLayer package. Everything else can be
deselected in ths scope. After adjustment, the selected scope shall
comprise of C_LightMgr (the SUT), the errorHandler package (since this
is required by RXF) ase well as the type definitions in
ImplementationDataTypes, PlatformTypes and RteDataTypes. Finally, the
TestArchitecture with all its elements and sub-packages shall belong to
the scope.
Now we return to the TestArchitecture and apply some modelling changes
to the architectural elements. We have above already mentioned, that a
TestComponent for SWC LightManager had been added to the
TestArchitecture for C_LightMgr. C_LightMgr has an association to its
instantiating SWC LightManager in the original model. For testing the
class C_LightMgr as unit, this asssociation plays no important role,
since the implementation of C_LightMgr does not access functionality of
SWC LightManager via this association. We, therefore, only need a
LightManager TestComponent as a stub realization, i.e. to generate a
suitable LightManager.h from it (which is included by C_LightMgr) and
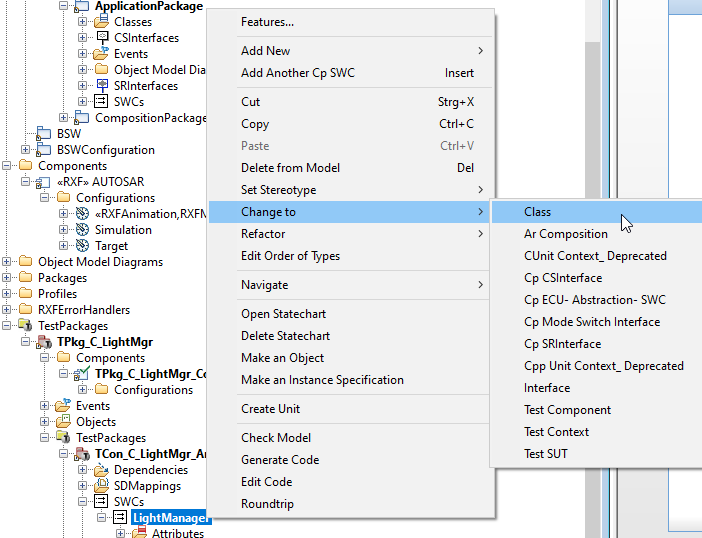
to initialize the association of C_LightMgr appropriately. Since we do
not want any unneccesary constructs left in LightManager and in
particular no ArUML specific remains, we first change it to a regular
class.
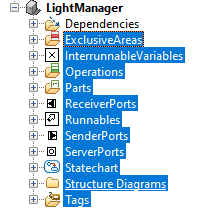
Now we remove everything except for its dependencies from the
TestComponent LightManager. The dependencies have to reamin in the
TestComponent for TestConductors navigation on the TestArchitecture.
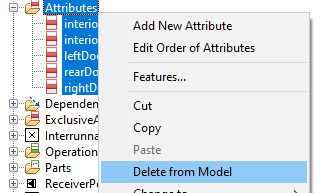
For removal of everything except for the dependencies, also multi selection of the nested elements can be used.
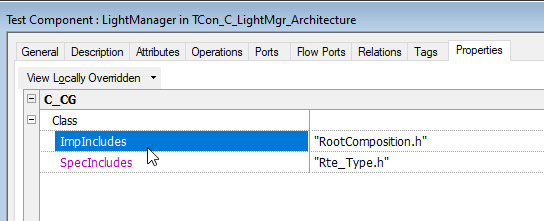
The now empty TestComponent LightManager still has some properties
set, since it was created from the SWC LightManager by 'cloning'. We
override property C_CG::Class::ImpIncludes by the default in order to
no longer include "RootComposition.h".
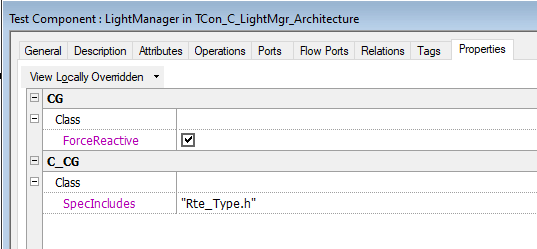
To avoid compile errors due to missing functions for reactive
initialization of the TestContext with all its parts, we set property
CG::Class::ForceReactive checked.
Next we have to add a TestFile as a replacement of the
Rte_LightManager file that was generated by the
ArUML_CP_miniRTEGenerator to run the example model with the
UML Target Debugger.
C_LightMgr invokes an Rte_Write Rte-API function in its operation
sendFrontlightstatusp().
We not only need to have this function and its owning file in the scope
to be able to compile and build the test application. We, moreover,
will have to specify and observe the call to that function in our test
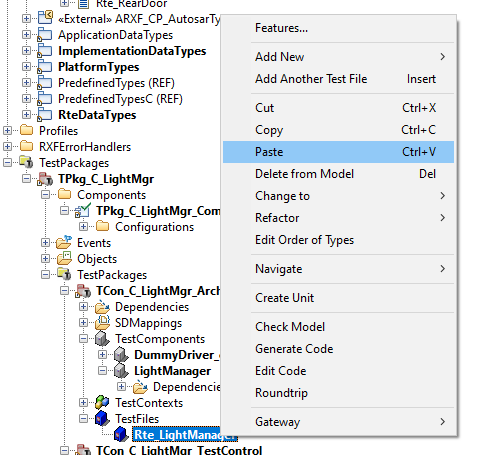
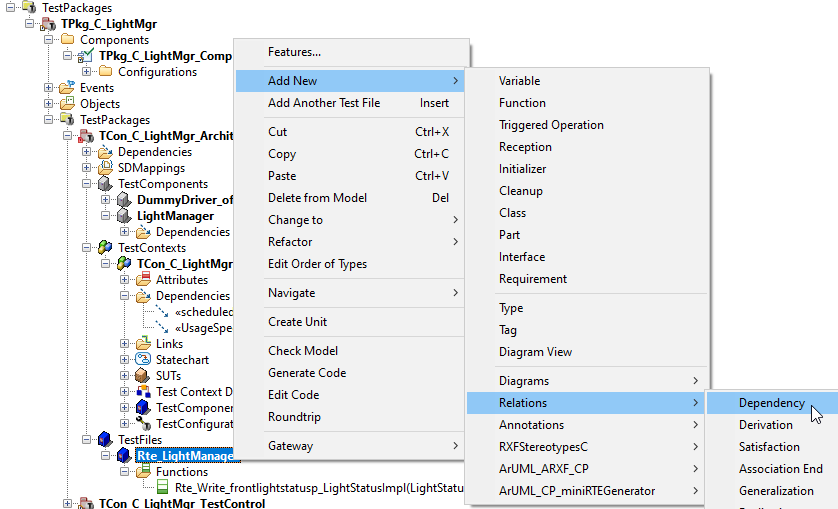
approach. Therefore, we add a new test artifact, a TestFile
Rte_LightManager to our TestArchitecture
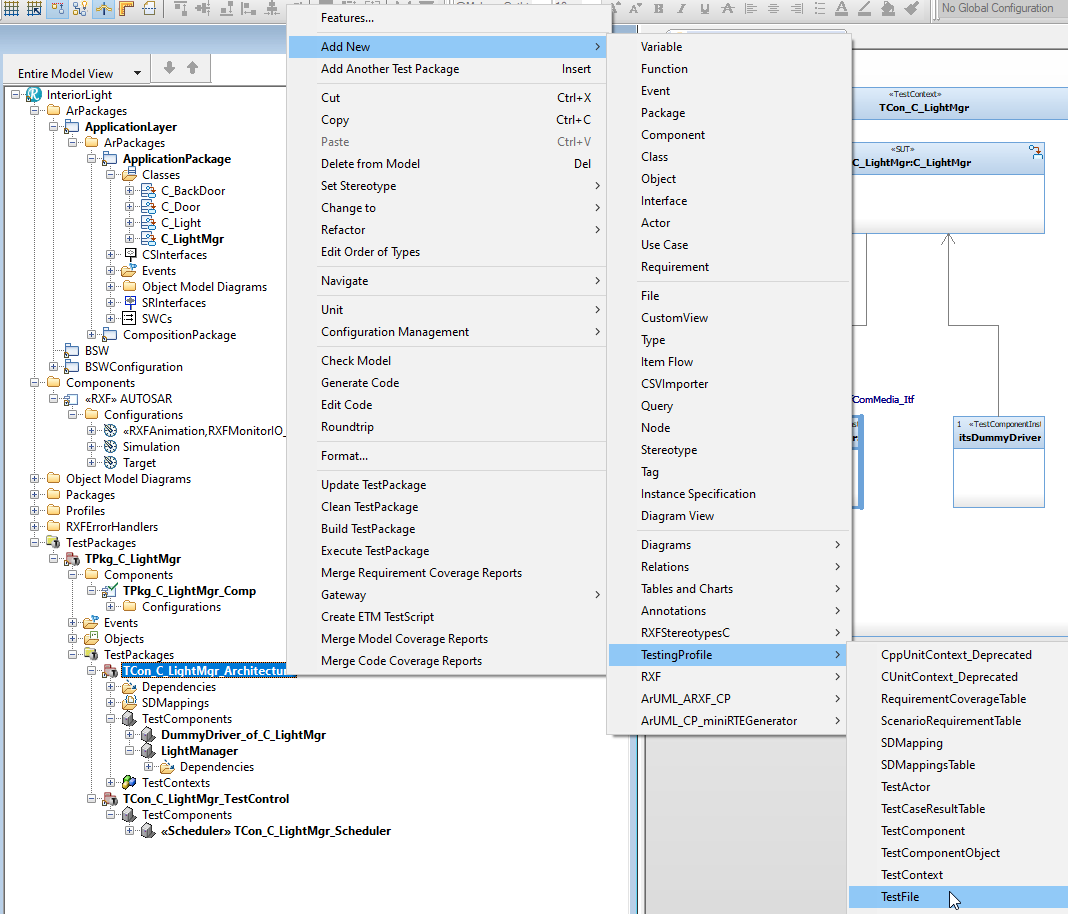
The new TestFile will be added with a
default name. We rename it to Rte_LightManager.
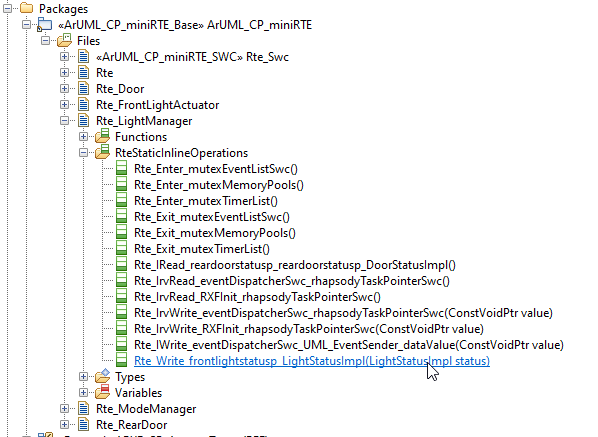
We then navigate to the generated simulation Rte in package
ArUML_CP_miniRte and copy function 'void
Rte_Write_frontlightstatusp_LightStatusImpl(LightStatusImpl status)'
from ArUML_CP_miniRte::Rte_Lightmanager and paste it to the TestFile
RteLightManager in our TestArchitecture.
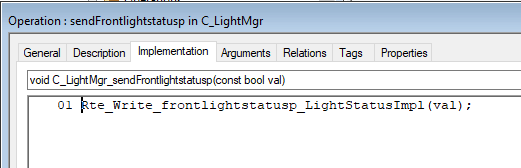
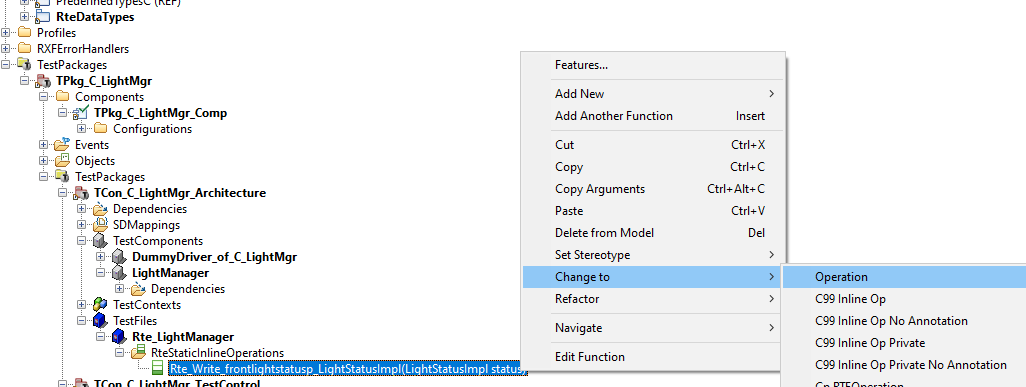
Since TestConductor can not instrument inline functions
appropriately and the Rte-API function is generated as 'static inline'
function by modifications to its writer-template, we change the copied
function to a regular operation. Note, that for testing purposes, the
function has to be instrumented by TestConductor with observation
assertion code. Since we are interested in observing whether the
operation is called in the right places, TestConductor must be able to
instrument the function. For testing purposes, itplays no role if the function is called inline or in a regular call.
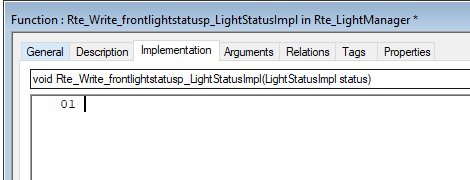
Because we want to observe the
calls to the Rte-API function but we are not interested in its
implemented behavior, we next empty its implementation body. The
original function calls further functionality in the generated
mini-RTE.
For testing C_LightMgr, we do not want the real behavior of the
function, we want to use our TestFile Rte_LightManager just as a stub,
i.e. as a test artifact on which functions can be called and these
calls can be observed in the test. But since we are onlly interested in
the behavior of our SUT C_LightMgr, we want to get rid of all avoidable
behavior that does not contribute to C_LightMgr's behavior.
To complete the adaption of the TestArchitecture according to our
needs, we have to add a few additional dependencies. These dependencies
serve on the one hand for navigation of TestConductor and on the other
hand generate some required include statements.
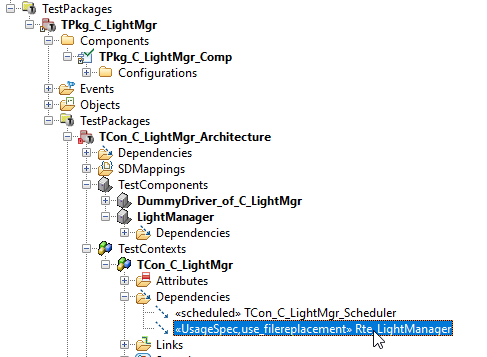
First, we have to add a dependency from the TestContext to the added TestFile Rte_LightManager:
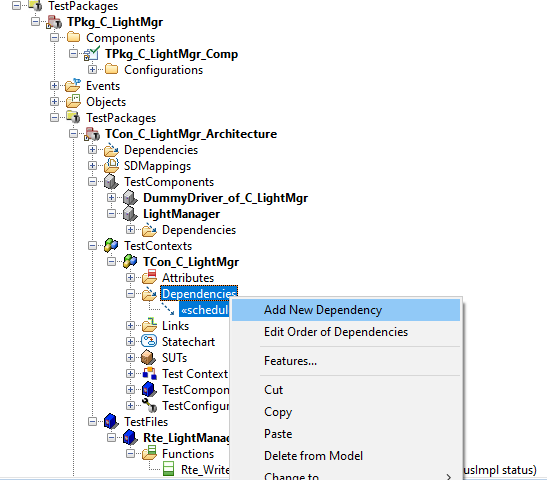
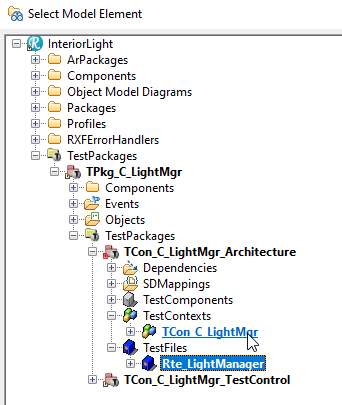
In the opening 'depends on' dialog, we choose the mini-browser to navigate
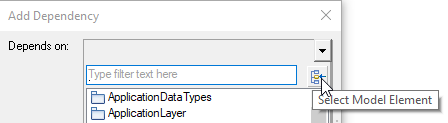
to the TestFile Rte_LightManager in the TestArchitecture:
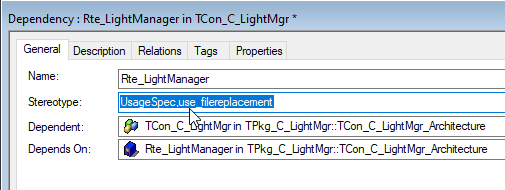
On the added dependency, we open the features dialog and set
stereotypes <<use_filereplacement>> and
<<UsageSpec>> on the dependency.
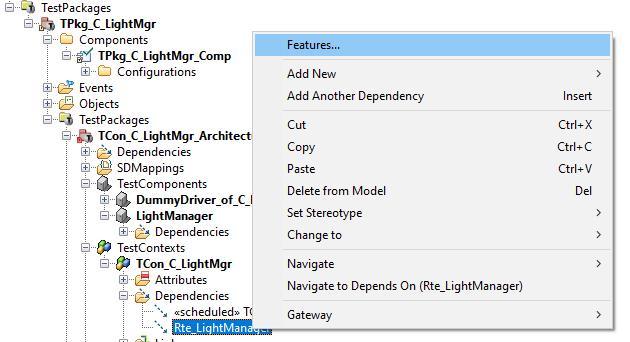
The first stereotype tells TestConductor, that weherever
Rte_Lightmanager is referenced, the TestFile shall be used instead of
theoriginal mini-RTE API file. The second stereotype lets Rhapsody's
code generation generate an include statement for the TestFile in the
header of the TestContext code.
We now need two further dependencies: one dependency from TestFile Rte_LightManager on the TestContext:
In the opening 'depends on' dialog, we again choose the
min-browser to select the TestContext as target of the
dependency:
For the created dependency of Rte_LightManager on TestContext
TCon_C_LightMgr, we open the features dialog and set setreotype
<<UsageImp>> on the dependency. This stereotype lets
Rhapsody's code generation generate an include of TCon_LightMgr in the
implementation file of Rte_LightManager.

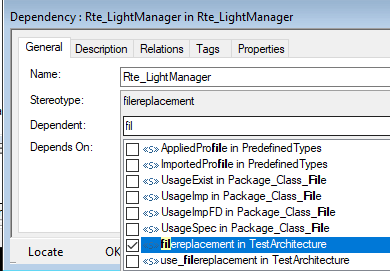
A last dependency is then added to TestFile Rte_LightManager,
depending on the original Rte_LightManager file in the ArUML_CP_miniRte
package. This dependency is added for TestConductor's navigation.

We set stereotype <<filereplacement>> on this last dependency.
This dependency serves for TestConductor navigation only and tells
TestConductor that TestFile Rte_LightManager is a stub replacement of
the original mini-RTE file Rte_LightManager.
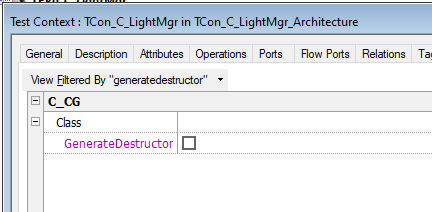
By default, Rhapsody generates constructors and destructors for all elements in the scope. For
our SUT C_LightMgr, the generation of a destructor is turned off by the
ArUML_ARXF profile. Therefor, we hav to prevent destructor generation
for our TestContext also, because otherwise the destructor of the
TestContext would call the destructors of also all its parts. Since
C_LightMgr is instantiated as a part in the TestContext, but does not
have a destructor, the generated code for TestContext TCon_C_LightMgr's
destructor would cause a compile error. Thus, we switch off
property C_CG::Class::GenerateDestructor on TestContext TCon_C_LightMgr.
After all this adjustment work, we can now create a first TestCase for our TestArchitecture:
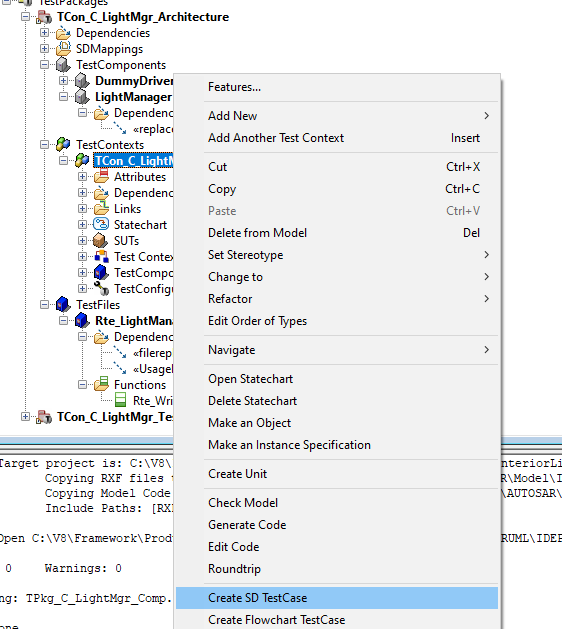
TestConductor creates a SequnceDiagram TestCase in the
TestContext. A TestCase is basically an operation of the TestContext.
The test specification can be provided using different techniques. The
most common technique to specify a TestCase behavior is using
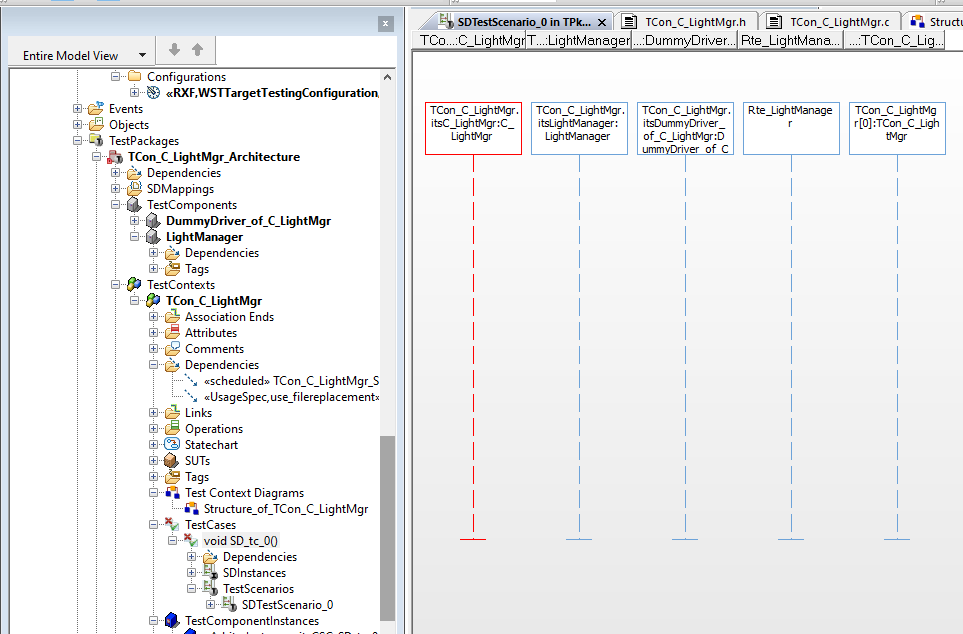
TestScenarios. On creation of a SequenceDiagram TestCase, TestConductor
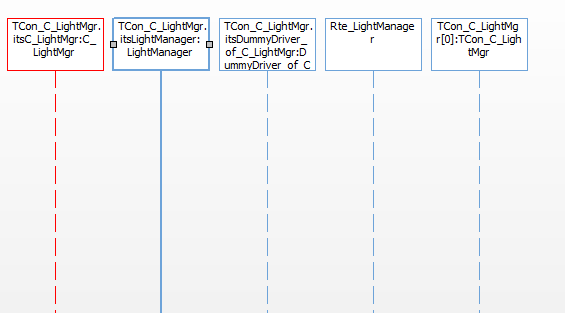
automatically adds an initial scenarioconsisting of life-lines for all instances in the TestAchitecture.
In case of our TestArchitecture, we obtain a life-line
for the SUT (marked red by default) , one life-line for the
LightManager stub replacement TestComponent, one for the dummy-driver,
which can be used to stimulate the SUT. Then threr are also life-lines
for the stub Rte_LightManager TestFile and the last one represents the
TestContext instance itself.
We will later use this TestScenario to specify a TestCase for
C_LightMgr. But first we leave the TestCase alone for the moment and
test whether we can build the test application. After we have ensured
that the test application can be build for an empty TestCase
specification, we will get back to the TestCase care about the real
testing work.
Building
For using TestConductor with the RXF framework, we need to start
the UML Target Debugger. It will serve as a proxy between Rhapsody
and TestConductor on the one hand and the IDEProject and the test
application on the other. This proxy based communication with the
IDEproject allows for maximal flexibility and integrates a wide range
of supported target IDEs with Rhapsody and TestConductor.

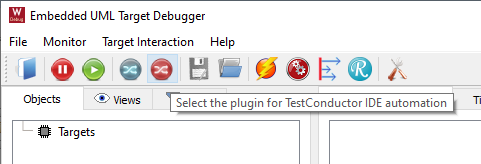
UML Target Debugger can simply be started from the Tools menu of Rhapsody.
For the use as proxy, we have to configure the plugin for
TestConductor IDE automation. This can be achieved by pressing the red
communication plugin button.
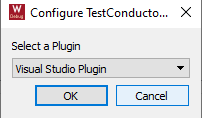
If not already selected, we select the visual studio plugin and press the OK button.
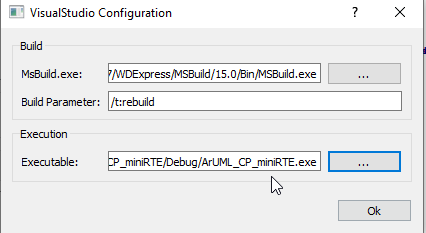
In the upcoming dialog, we have to verify or correct the path to
MSBuild.exe. MSBuild.exe can be found in your Microsoft Visual Studio
installation and serves for a 'headless' build of the project, i.e. builds the project without opening the IDE.

In the Executable filed of the dialog, we have to provide the
absolute path to the binary that will be (or was already) build by the
IDEProject. As we already used the project for the interactive
execution with the mini-RTE and UML Target Debugger, there sould be already
an executable in the Debug folder of the project.
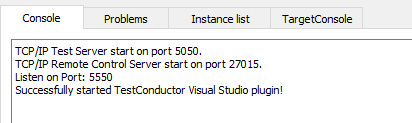
After leaving the dialog by pressing Ok, the UML Target Debugger will start the plugin and give a status message in its output window.
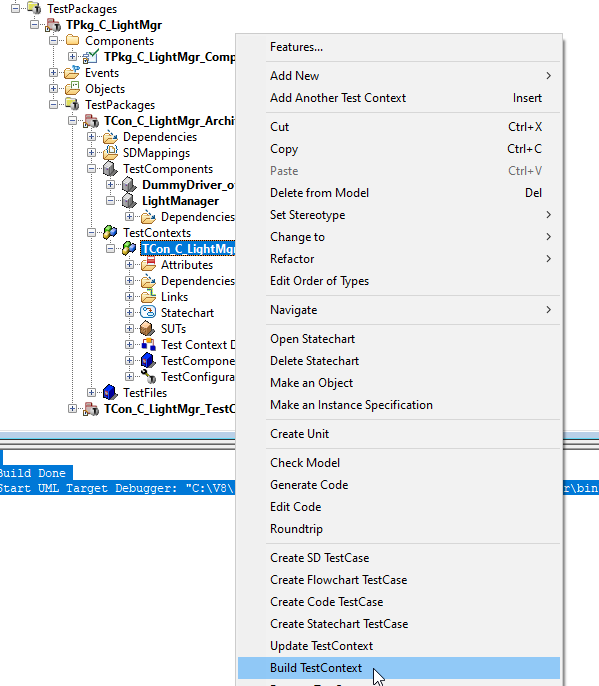
Now we can start a build attempt from Rhapsody's context menu. On TestContext, we invoke 'Build TestContext'
This action will check whether an update or generation of
temporary test artifacts by TestConductor is needed. Since we are
invoking Update/Build the first time for our TestContext, TestConductor
will detect a need for update and prompt the user for confirmation.
After confirmation, update of the TestContext, code generation and
build will be performed in one sweep. For RXF, the build also involves
invocation of the RXF Deployer, that deploys the IDEProject with the
generated code.
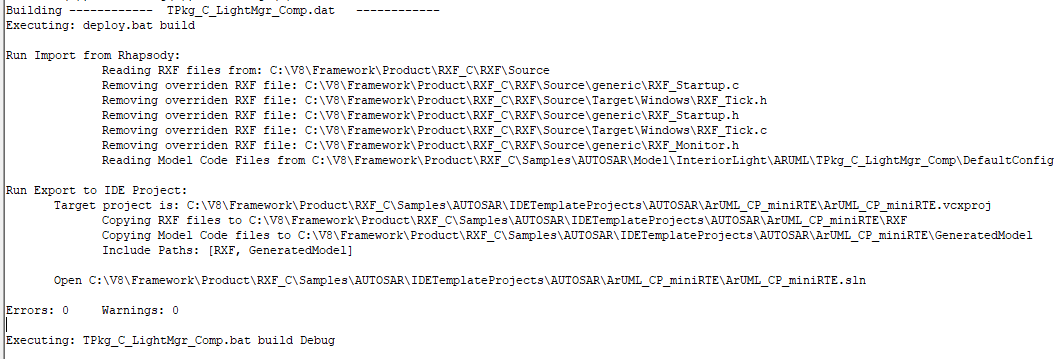
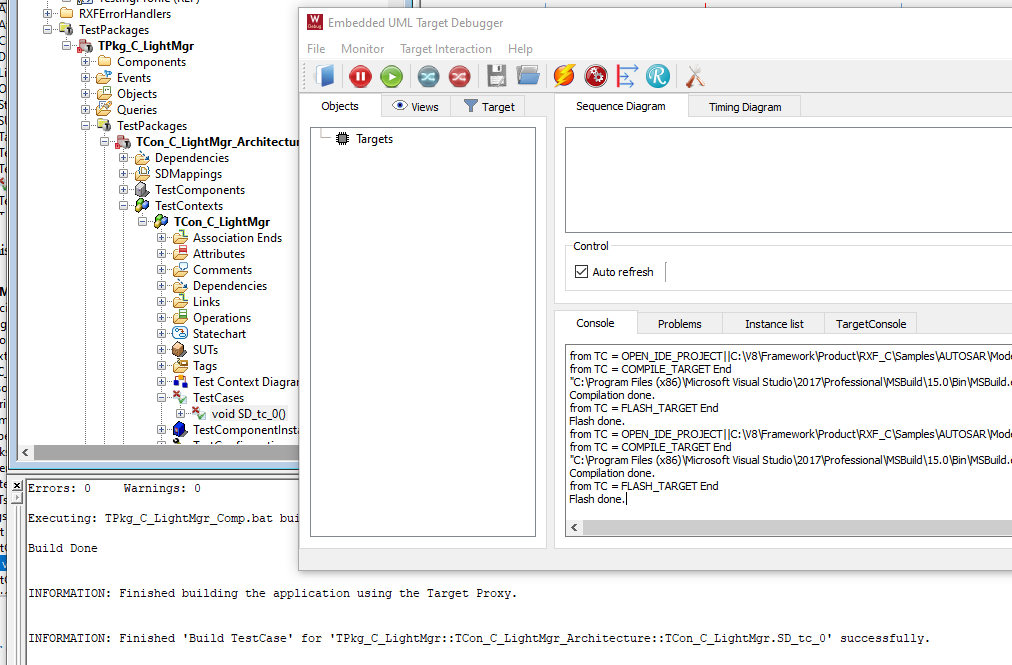
After all this internal steps, TestConductor will send a compile command to the UML Target Debugger.
the UML Target Debugger informs about reception of the command and starts the build of the IDEProject using the MSBuid.exe command.

We succeeded with our adaptions of the TestArchitecture and could build the test application:

Troubleshooting: The integration of TestConductor with RXF via the UML Target Debugger and Visual
Studio relies on building the test application using MSBuild.exe. This
integration offers a very convenient way to update, build and execute
TestCases if everything works as desired. If the build fails with
compile-errors for some reasons, it will be necessary to manually
interact with Visual Studio and the used IDEProject. To open the
IDEProject in Visual Studio, please navigate to the .vcxproj file in
the file system browser and open the IDEProject in Visual Studio. By
manually rebuilding the project, you can get detailed information about
the reasons for the compile-errors. The identified problems need then
to be fixed in the TestArchitecture and a 'Build TestContext'
will then update the test artifacts if necessary, generate code
again, deploy the IDEproject and start a new build attempt via the
UML Target Debugger.
Testing
We now return to the TestScenario and
start specifying the interaction we want to test. For the C_LightMgr we
want to test that the C_LightMgr reacts on one opeening door with
turning the light on, that a second opening door does not change the
ligt status. Also closing one of two open door shall not switch the
light of again, but the light shall then be turned off, if the last
open door is closed.
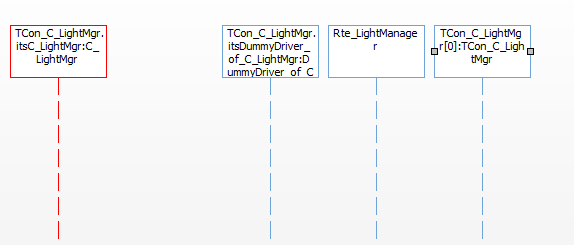
In order to specify this sceanrio, we
need of course the life-line for our SUT instance
TCon_C_LightMgr.itsC_LightMgr (the red one), we need another life-line
from which our SUT can be stimulated and, since the reaction of our SUT
will be invocation of an Rte-API function, we need the Rte_LightManager
file life-line as receiver of the Rte-API call showing the reaction of
our SUT. We, hence, can delete the life-lines for
TCon_C_LightMgr.itsLitghtManager and for the TestContext
instance TCon_C_LightMgr[0] :
In order to delete the respective
life-line, select it and press the delete-key (do not 'delete from
model' in sequence diagram editor, because this deletes the underlying
model element, not only its visaulization in the seuence diagram)..
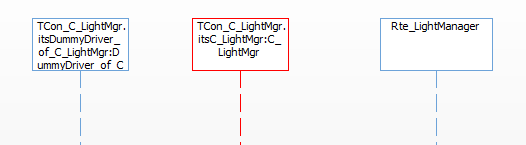
We then re-arrange the remaining
life-lines. It is recomennded to organize the life-lines according to
the chain of reactions from left to right. We will use the dummy-driver
to stimulate our SUT. The SUT will cause messages to the
Rte_LightManager life-line. So we come up with the following order:
TestConductor will automatically
generate appropriate driver operations for messages from
TestComponentInstances, such as the dummy-driver. For messages from the
SUT to TestComponents or TestFiles, TestConductor will instrument the
respective test artifact with the appropriate observation code.
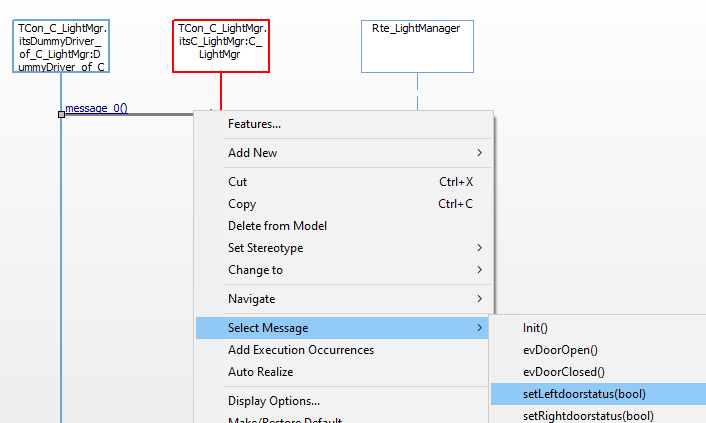
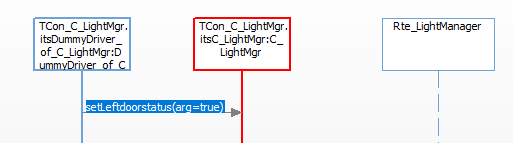
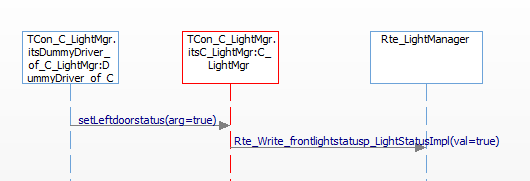
We start the specification with a message from the dummy-driver to the SUT life-line
Right click on the newly added message
offers realizing the message by some operation or reception in the
receiving instance via 'Select Message' in the context menu
We choose setLeftdoorstatus(bool) form
the menu and will have to specify the value of the operation argument
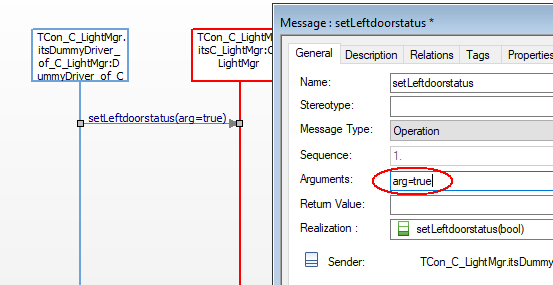
in the next step. One can either edit the message directly (by clicking
into the message annotation) or open the features dialog on the message
to specify the argument value.
Alternative1: editing directly
Alternative2: editing in the features dialog
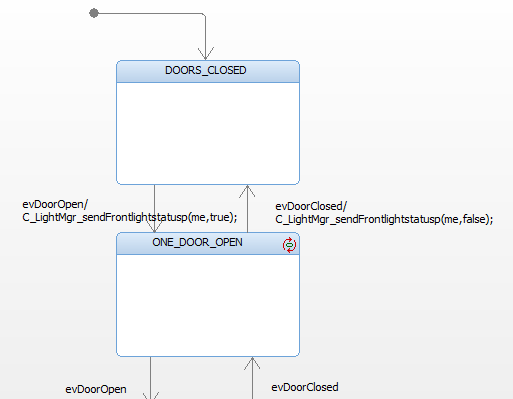
According to its statechart we expect
our SUT itsC_LightMgr to react on this message by invoking
Rte_Write_frontlightstatusp_LightStatusImpl()
The call of the Rte-API function is encapsulated in C_LightMgr_sendFrontLightstatusp()
Hence, we specify the reaction of the setLeftdoorstatus() stimulus by:
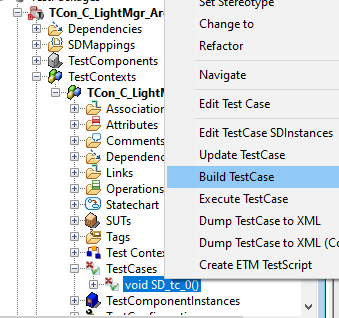
Build TestCase
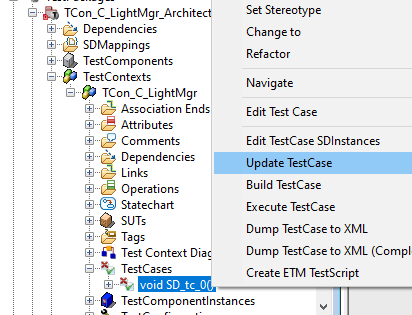
We can already update, build and
execute our TestCase now to check if the specification is correct so
far, even if we plan to extend the specification later.
Update TestCase finished without warnings or errors. Next we can build the TestCase
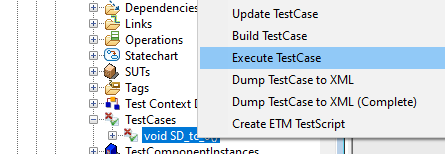
Also the build was successful. Next, we execute the TestCase:
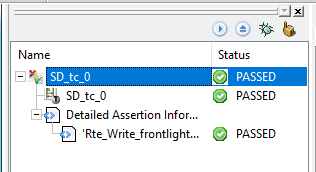
The TestCase is executed via the UML Target Debugger proxy. An execution window opens in Rhapsody and shows the execution result:
Now we have verified that our initial
TestCase specifies a valid scenario, we can extend the
TestSpecification with further messages.
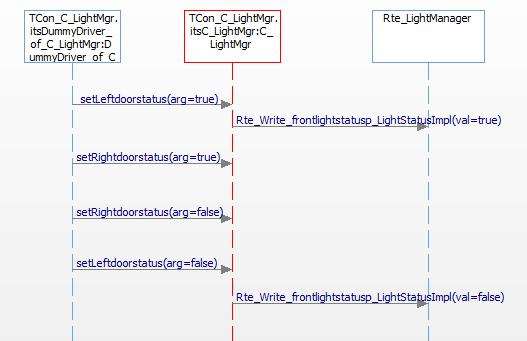
This sceanrio specifies that as
reaction to the first opening door, itsC_LightMgr will invoke
Rte_Write_frontlightstatusp_LightStatusImpl(val=true) on the Rte-API to
turn the light on. On a second opening door, itsC_LightMgr will not
react and also on a closing door no reaction is shown unless another
door ist still open. Only on the last closing door, itsC_LightMgr will
react by invoking
Rte_Write_frontlightstatusp_LightStatusImpl(val=false) on the Rte-API
to turn the light off again.
We verify, that the TestCase specifies
a valid scenario by invoking 'Execute TestCase' again. TestConductor
will notice, that the TestSpecification has changed since the last
execution. TestConductor will , thus, prompt for update and build and
will on confirmation of the dialog perform update, build and execute of
the TestCase in one sweep.
The TestCase will pass.
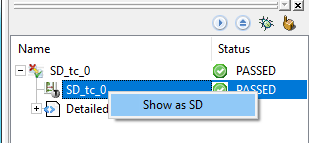
On the execution result in the
execution window, one can invoke 'Show as SD' to get a
witness of the executed TestCase:
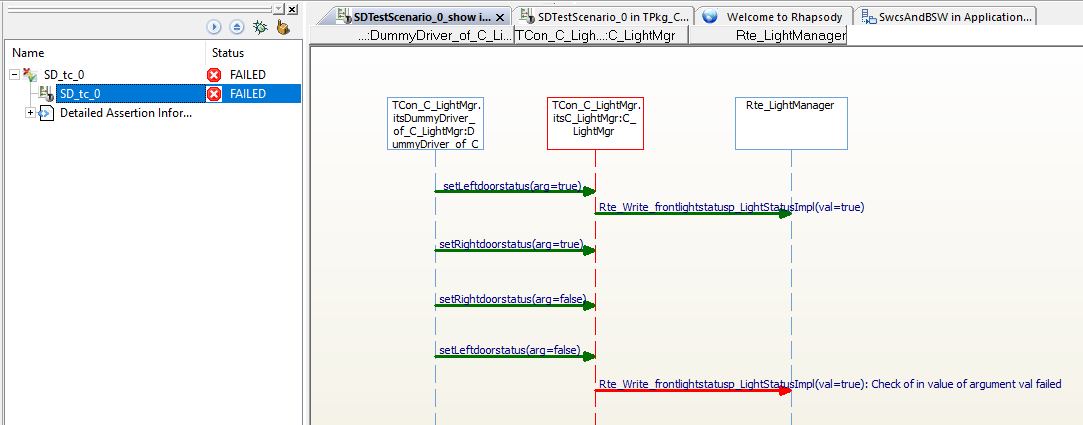
This will open a colored witness
scenario, where TestConductor shows messages in green, that were
stimulated and observed as specified. Messages colored blue are either
omited or not observed as expected, and messages colored in red denote
reasons for TestCase failures. If we e.g. specify the argument of
the second Rte_Write_frontlightstatusp_LightStatusImpl(val=true)
with a wrong value, then re-execution of the TestCase will obtain a
failed result and the witness will tell us the reason for the failure:
Model Coverage
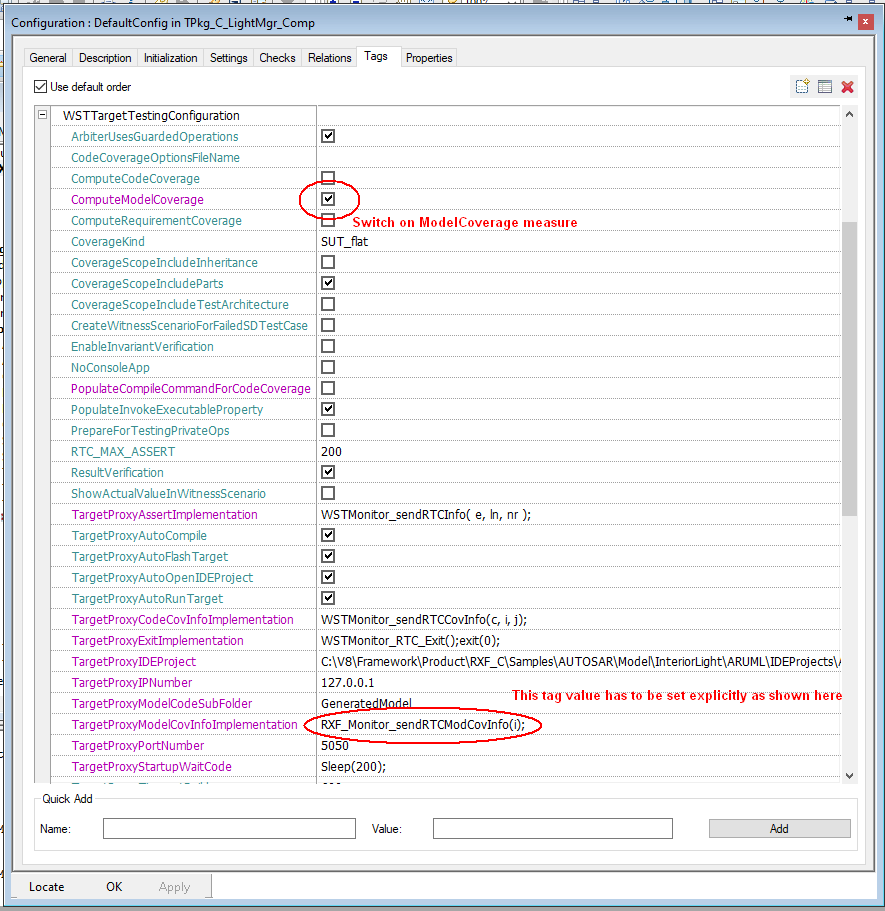
Finally, TestConductor offers also
coverage measures for execution of TestCases. Using model coverage
measure can be obtained very easily (requires Rhapsody 9.0.1 iFix1 or
newer). On the code generation configuration of the TestArchitecture,
open the features dialog and switch to the tags tab:
If we invoke 'Execute TestCase' again
on our TestCase, TestConductor will notice that the two respective tags
have changed and prompt for update and build.
After confirmation and update, build
and execute, the TestCase will pass (provided, that you reversed the
above change of the last message in the specification).
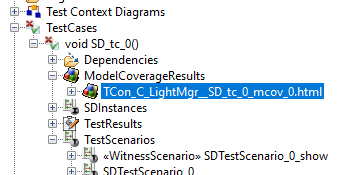
After execution, you will find a ModelCoverage result below the TestCase in the Rhapsody browser:
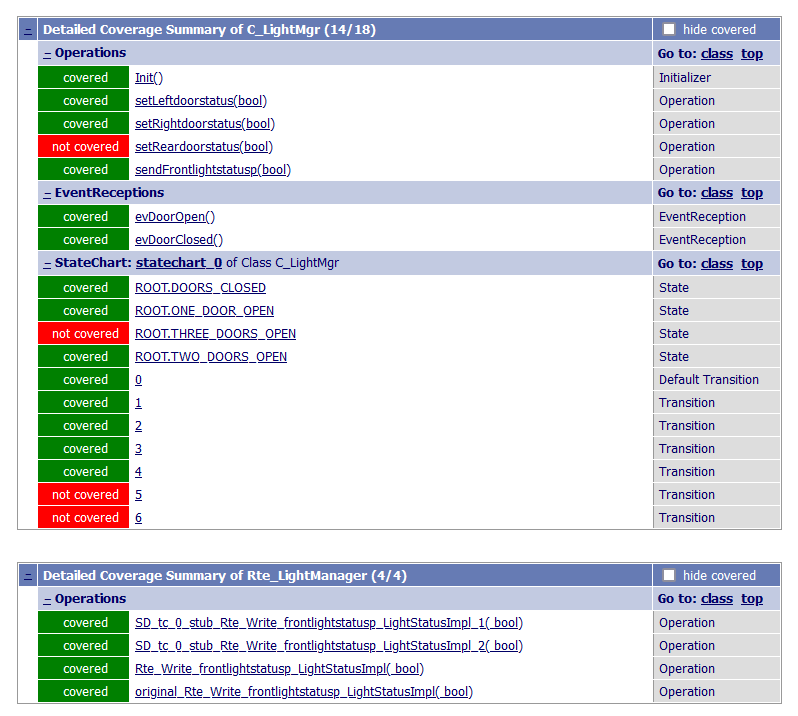
You can open the ModelCoverage report in your internet browser by double-clicking the report:
The report shows that the model is
already covered to some degree by only the one TestCase. We see, that
operation setReardoostatus() has not been invoked by the TestCase
and, accordingly, some states and transitions of C_LightMgr's
statechart are not yet covered by testing.