Browsing a model
Model elements are by default displayed as a tree in the model editor, where you can expand the model element references. You may alternatively display model elements into tables, with columns revealing most notable features of these elements.
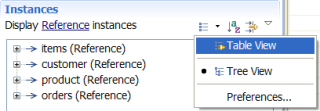
Tables can be activated in the Model editor. To activate or deactivate a table view for model instances, use the Display Table View button of the Instances section toolbar:

Clicking a table column header affects the way model elements are sorted:

The table toolbar provides buttons to globally increment or decrement row's height. This is useful when a column relates to a multi-valuated reference. In such case, the connected elements are displayed as a nested list in table cells, and having the control on the row height is quite important.
You can export into CSV file format the current table, clicking on the CSV Export button in the table toolbar. This enables to export instances view to third-party tool, like Microsoft ExcelŽ for example
The metamodel administrator, as a plugin developer, is in charge to provide the relevant table definitions for a particular metamodel. The platform may not provide by itself any default table template for a particular metamodel.
You may dynamically add new table templates for a metamodel, using the main menu Window > Preferences and MDWorkbench > Models > Tables.
This preference page shows all available tables, grouped by metamodels, either defined by metamodel administrators and contributed directly from preferences.
To add a new table template, you have to: